Java EE Application Development using Tomcat, OpenEJB and Hibernate
Before I start writing this blog entry, I'd better point out a few things.
This blog entry is not about how to make a good Java EE application yet is about how to use OpenEJB on Apache Tomcat server with Hibernate as an implementation of the JPA. If you are looking for better Java EE development or similar, this one is not for you. 🙂
I don't have enough time to explain all the details of how to install JDK, Eclipse, Tomcat and so on. So this post doesn't have that level of details. I simply assume that you've already known how to install JDK, Eclipse and Tomcat. Well, anyway, installing Eclipse and Tomcat are as easy as extracting a zip or gzip file and JDK installation is also not difficult at all.
This post does not cover how to use those tools and frameworks in the production environment. In other words, it is only for the development. Setting up the environment for development and for the production use have some differences. It is, however not that hard to figure out once you know how to use those in your development environment.
1. Development Environment
First of all, I'm going to list the development environment and tools I have for this introductory tutorial post. (Click each name and it will take you to the download page).
OS: Ubuntu Linux Jaunty Jackalope 9.04 Desktop 64bit
Java: Sun JDK 1.6.0_16 (64 bit) (it's from the Ubuntu repository).
Database: MySQL Community Server 5.0 (it's from the Ubuntu repository).
JDBC Driver: MySQL Connector/J 5.1.10
Eclipse: Eclipse IDE for Java EE Developer Ganymede SR2 (Eclipse 3.4.2)
Tomcat: Tomcat 6.0.20
OpenEJB: OpenEJB 3.1.1 (openejb.war)
Hibernate: Hibernate 3.2.1GA (including hibernate-3.2.1.ga, hibernate-annotations-3.2.1.ga, hibernate-entitymanager-3.2.1.ga) (OR just >>download this<<)
2. Installing OpenEJB
Java EE server normally means a Java application server which consists of a Servlet container and an EJB container. Apache Tomcat is a servlet container but not an EJB container so you need to have an EJB container like OpenEJB or use a Java EE server instead of Tomcat in order to use EJB unless you're using the frameworks supporting EJB such as Spring framework. "So if I use Tomcat server and Spring framework, do I not need OpenEJB or other Java EE servers to use EJB?" No, you don't.
Since this post is, as already mentioned, about using using EJB on Tomcat with OpenEJB and Hibernate, I will first show you how to install OpenEJB.
Before installing OpenEJB, don't forget to copy JDBC driver that is, in this post, MySQL Connector/J to the $TOMCAT/lib directory.
Copy the Connector/J jar file to the Tomcat's library directory ($TOMCAT_HOME/lib)
Select Connector/J and Extract to the $TOMCAT/lib directory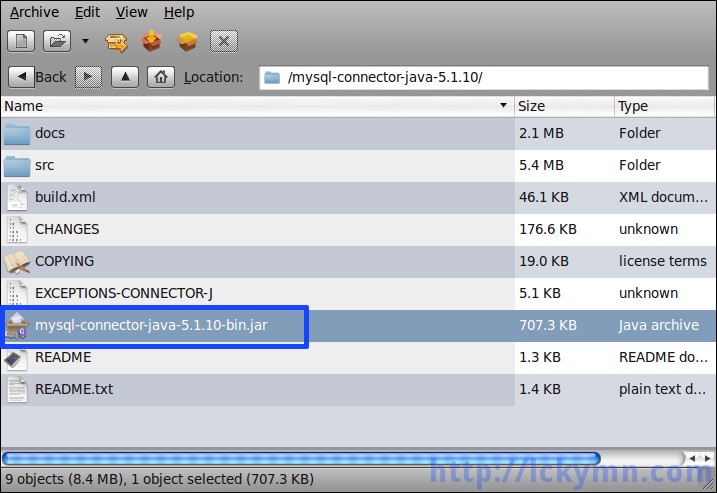
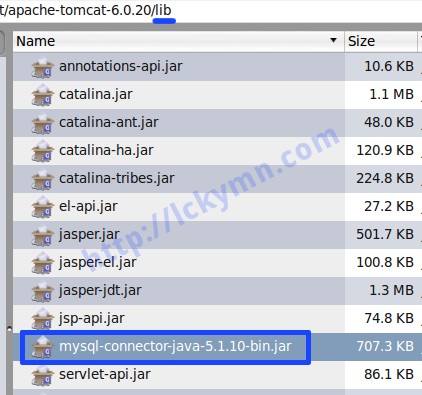
Make sure the Connector/J jar file is in the $TOMCAT/lib directory.
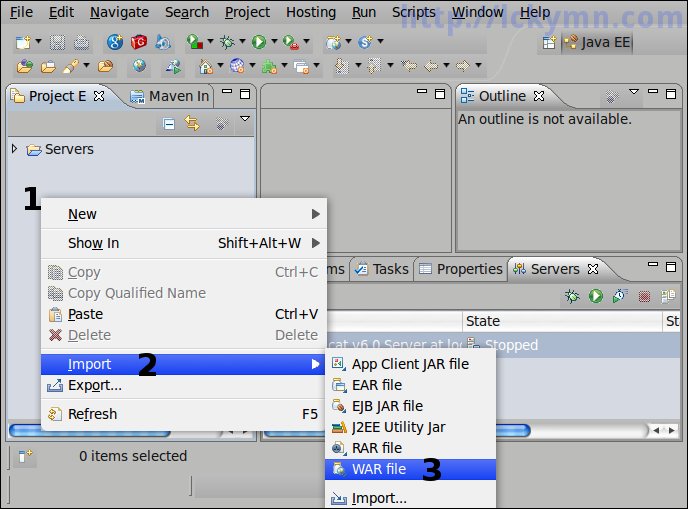
Run Eclipse and add Tomcat server: Menu - Window -> Preferences -> Server -> Runtime Environments -> Add
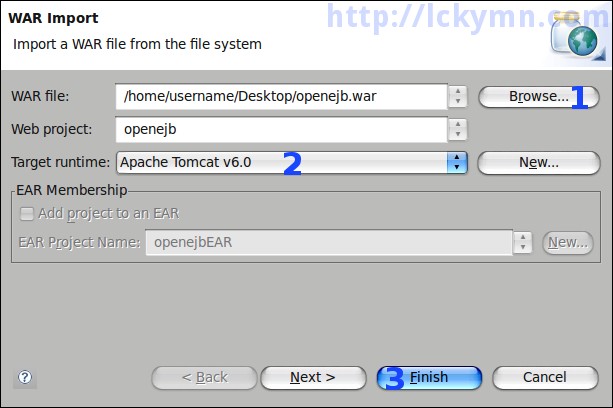
Download the openejb.war, OpenEJB for Tomcat, and import the file from Eclipse. -Right click on the project explorer -> Import -> WAR file
Click the 'Browse' button and select the openejb.war file -> Select your Tomcat 6.0 as the target runtime. -> Click the 'Finish' button.
3. Add OpenEJB project to the Server to deploy
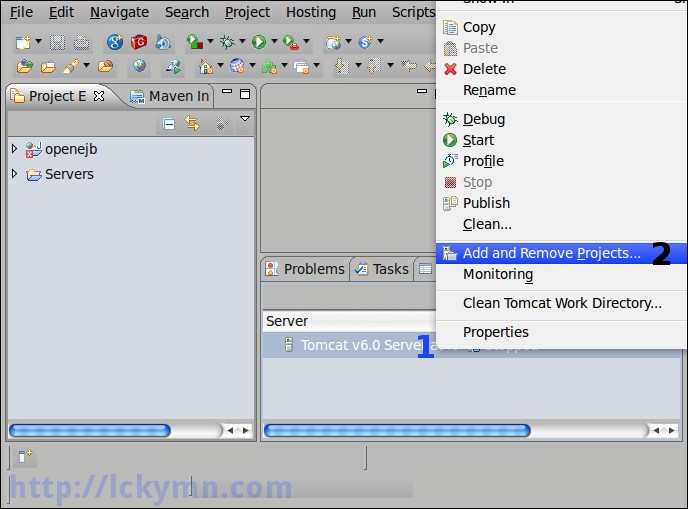
Right click on the server name in the 'Server' view -> Select the 'Add and Remove Projects...'
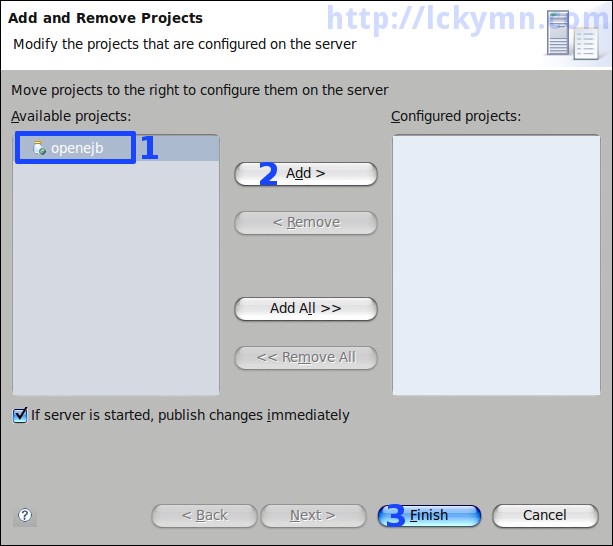
Select openejb -> Click the 'Add' button -> Click the 'Finish' button
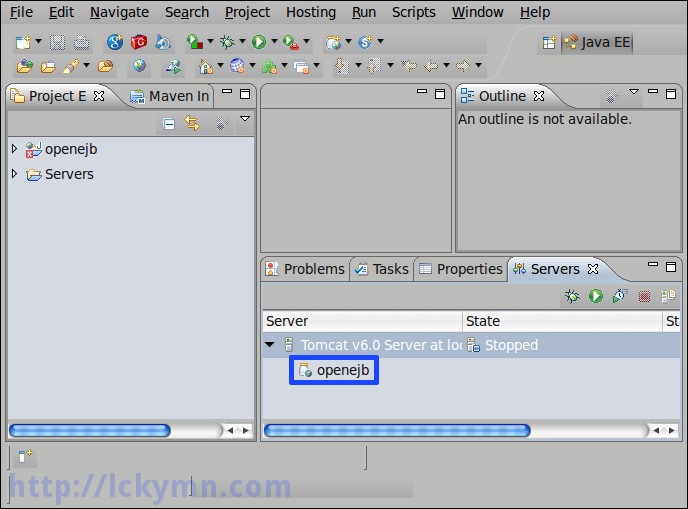
openejb is ready to be deployed.
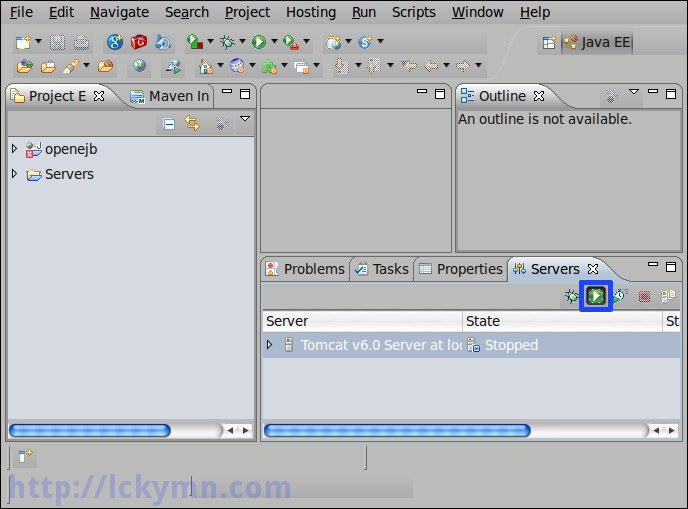
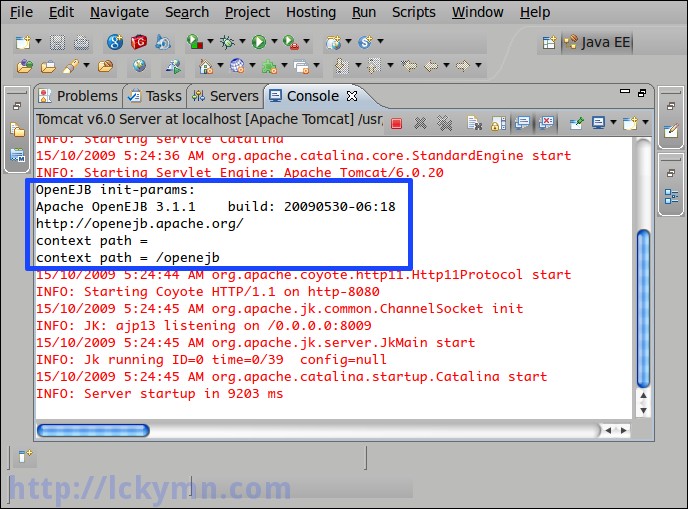
Now run the server to deploy openejb.
openejb is successfully deployed.
4. Set up DataSource
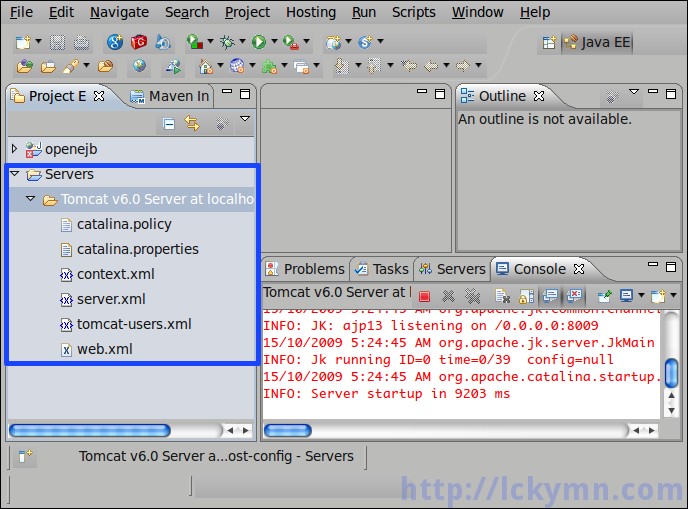
openejb.xml has to be copied to the Tomcat configuration folder of the Eclipse workspace.
If you are using Tomcat without OpenEJB and want to create a DataSource, you might do by putting the DataSource info to Tomcat's
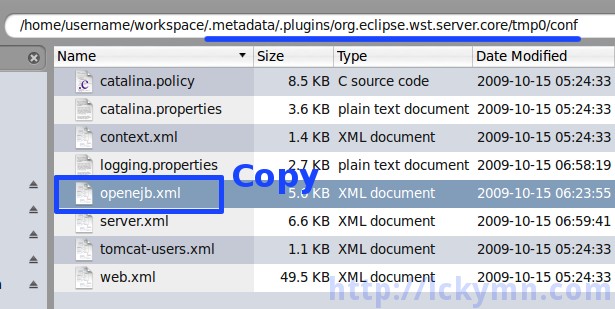
server.xmlfile or your application's context configuration file (your_app/META-INF/context.xml). Yet to create the DataSource for JPA, you need to do throughopenejb.xmlfile. It is created in the Tomcat folder in the.metadatafolder of your Eclipse workspace when the openejb project is deployed. However, it is not copied automatically to the configuration folder of your Eclipse workspace, you should copy the openejb.xml file to the Server configuration folder manually. If the location of the workspace is '/home/username/workspace', the Tomcat is in '/home/username/test-workspace/.metadata/.plugins/org.eclipse.wst.server.core' and theopenejb.xmlfile can be found in the '/home/username/workspace/.metadata/.plugins/org.eclipse.wst.server.core/tmp0/conf' directory.Find the openejb.xml file and copy to the Tomcat configuration folder of the Eclipse workspace.
Paste the file to the Tomcat configuration folder of the Eclipse workspace.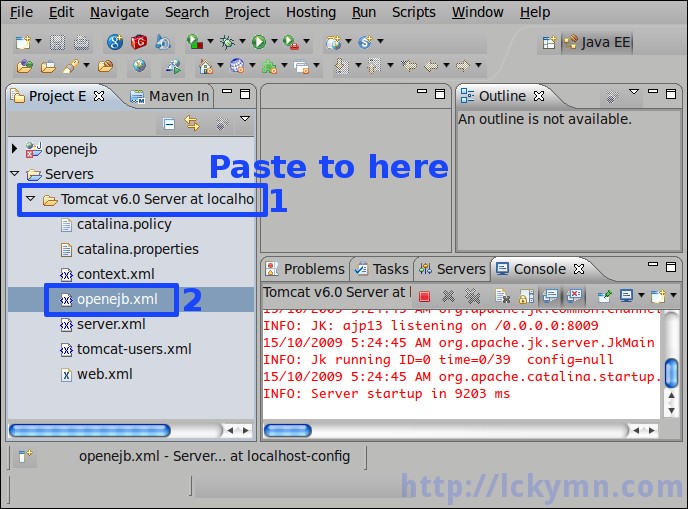
Open the 'openejb.xml' file then you can find the default DataSources.
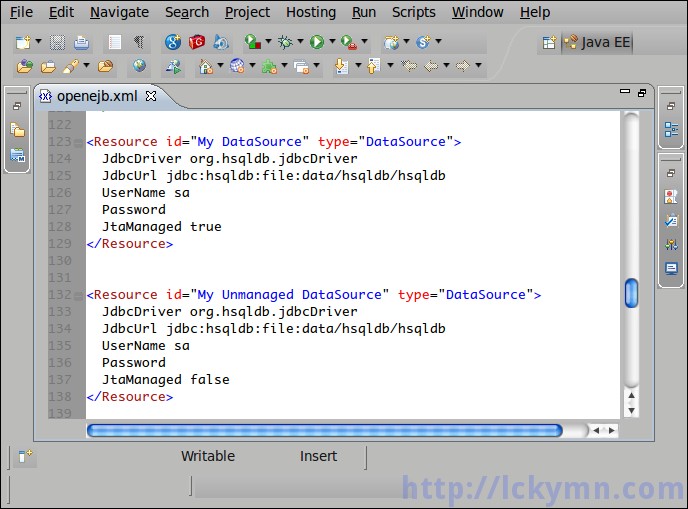 One is JTA managed while the other is not. Both use HSQLDB which is a Java database. If you don't have any database installed on you computer or if you want, you can use it. As mentioned early, I am going to use MySQL so a new data source set up for MySQL is required.
Add the following lines and modify for your own database.
<Resource id="mysqlDataSource" type="javax.sql.DataSource">
  JdbcDriver        com.mysql.jdbc.Driver
  JdbcUrl           jdbc:mysql://localhost:3306/test_db
  UserName          test_user
  Password          1234
  JtaManaged        true
  DefaultAutoCommit true
  InitialSize       3
  MaxActive         20
  MinIdle           20
  MaxIdle           0
  MaxWait           50000
  ValidationQuery   SELECT 1
  TestOnBorrow      true
  TestOnReturn      false
  TestWhileIdle     false
</Resource>
DataSource to access the MySQL database.
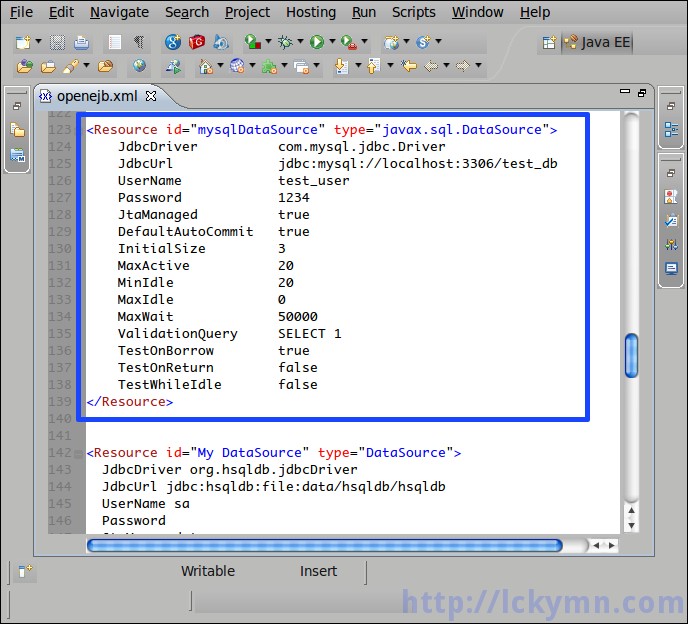
If you want to use OpenJPA as an implmentation of the JPA, you can do now. However, to use Hibernate there is one more step to do.
5. Install Hibernate
If you just have the Hibernate jar files in your application directory (e.g. your_app/WEB-INF/lib), the EJB container that is OpenEJB cannot find the hibernate classes as it is the container, it tries to find the hibernate class from the server's lib directory. Thus just like you need to copy the JDBC driver, in this post it's 'Connector/J', to the tomcat's lib directory, the hibernate jar files should be placed in the Tomcat's lib directory.
Otherwise, you will get an error like this.
ERROR - Unable to deploy collapsed ear in war /test-web-hibernate: Exception: Creating application failed: /home/username/workspace/.metadata/.plugins/org.eclipse.wst.server.core/tmp0/wtpwebapps/test-web-hibernate: java.lang.ClassNotFoundException: org.hibernate.ejb.HibernatePersistence: org.hibernate.ejb.HibernatePersistence
org.apache.openejb.OpenEJBException: Creating application failed: /home/username/workspace/.metadata/.plugins/org.eclipse.wst.server.core/tmp0/wtpwebapps/test-web-hibernate: java.lang.ClassNotFoundException: org.hibernate.ejb.HibernatePersistence: org.hibernate.ejb.HibernatePersistence
  at org.apache.openejb.assembler.classic.Assembler.createApplication(Assembler.java:658)
  at org.apache.openejb.assembler.classic.Assembler.createApplication(Assembler.java:442)
  at org.apache.openejb.tomcat.catalina.TomcatWebAppBuilder.start(TomcatWebAppBuilder.java:249)
  at org.apache.openejb.tomcat.catalina.GlobalListenerSupport.lifecycleEvent(GlobalListenerSupport.java:58)
  at org.apache.catalina.util.LifecycleSupport.fireLifecycleEvent(LifecycleSupport.java:119)
  at org.apache.catalina.core.StandardContext.start(StandardContext.java:4339)
  at org.apache.catalina.core.StandardContext.reload(StandardContext.java:3190)
  at org.apache.catalina.loader.WebappLoader.backgroundProcess(WebappLoader.java:404)
  at org.apache.catalina.core.ContainerBase.backgroundProcess(ContainerBase.java:1309)
  at org.apache.catalina.core.ContainerBase$ContainerBackgroundProcessor.processChildren(ContainerBase.java:1601)
  at org.apache.catalina.core.ContainerBase$ContainerBackgroundProcessor.processChildren(ContainerBase.java:1610)
  at org.apache.catalina.core.ContainerBase$ContainerBackgroundProcessor.processChildren(ContainerBase.java:1610)
  at org.apache.catalina.core.ContainerBase$ContainerBackgroundProcessor.run(ContainerBase.java:1590)
  at java.lang.Thread.run(Thread.java:619)
Caused by: org.apache.openejb.OpenEJBException: java.lang.ClassNotFoundException: org.hibernate.ejb.HibernatePersistence: org.hibernate.ejb.HibernatePersistence
  at org.apache.openejb.assembler.classic.Assembler.createApplication(Assembler.java:487)
  ... 13 more
Caused by: java.lang.ClassNotFoundException: org.hibernate.ejb.HibernatePersistence
  at org.apache.catalina.loader.WebappClassLoader.loadClass(WebappClassLoader.java:1387)
  at org.apache.catalina.loader.WebappClassLoader.loadClass(WebappClassLoader.java:1233)
  at org.apache.openejb.assembler.classic.PersistenceBuilder.createEntityManagerFactory(PersistenceBuilder.java:177)
  at org.apache.openejb.assembler.classic.Assembler.createApplication(Assembler.java:482)
  ... 13 more
So you have to copy the hibernate to the Tomcat's lib directory. Unfortunately, the latest version of Hibernate (3.4.0GA) does not work on OpenEJB 3.1.1 yet I found the 3.2.1GA version works. However, there is another problem. When you try to use Tomcat, OpenEJB and Hibernate, it may not work well with the dependency libraries required by Hibernate 3.2.1GA so you should carefully choose the dependency files. This means you need to test and find which ones are working well with OpenEJB and which are not. Fortunately, here is a good news. I tested and found the files working well with Tomcat 6 and OpenEJB and zipped the files. Thus you can simply download this file and extract it to the
$TOMCAT/libdirectory.Click Here to Download the File!
After downloading, extract all the files inside to the Tomcat's lib directory (
$TOMCAT/lib) just like what you did to install JDBC driver, Connector/J.
6. Adding logger configuration (Optional)
By default, OpenEJB creates a log file in the Eclipse's $TOMCAT/logs directory. It is very inconvenient as you have to open the file when you want to get information from the log. However, it is very easy to change this to make it displayed on the Console view of Eclipse.
Right click on the Tomcat configuration folder -> Select 'New' -> Select 'File' -> crated a file with the name 'logging.properties'.
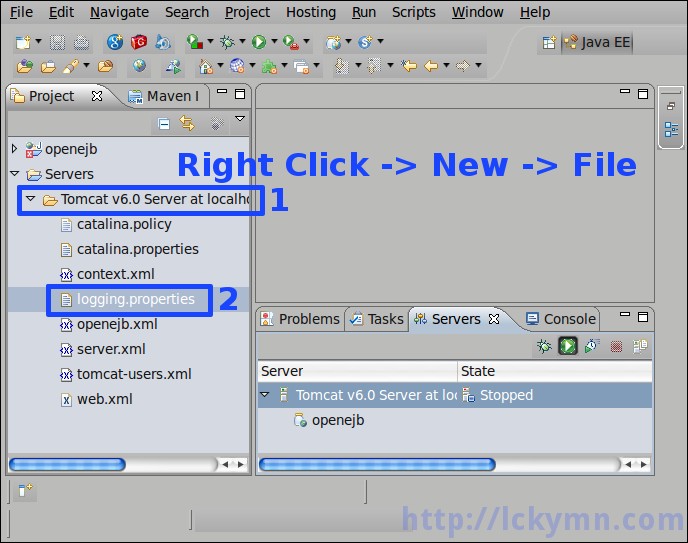
Open the file and put the following lines
log4j.rootLogger                   = fatal,C
log4j.category.OpenEJB             = warn
log4j.category.OpenEJB.options     = info
log4j.category.OpenEJB.server      = info
log4j.category.OpenEJB.startup     = info
log4j.category.OpenEJB.startup.service = warn
log4j.category.OpenEJB.startup.config = info
log4j.category.OpenEJB.hsql        = info
log4j.category.CORBA-Adapter       = info
log4j.category.Transaction         = warn
log4j.category.org.apache.activemq = error
log4j.category.org.apache.geronimo = error
log4j.category.openjpa             = error

log4j.appender.C                   = org.apache.log4j.ConsoleAppender
log4j.appender.C.layout            = org.apache.log4j.SimpleLayout
Put the logger config details
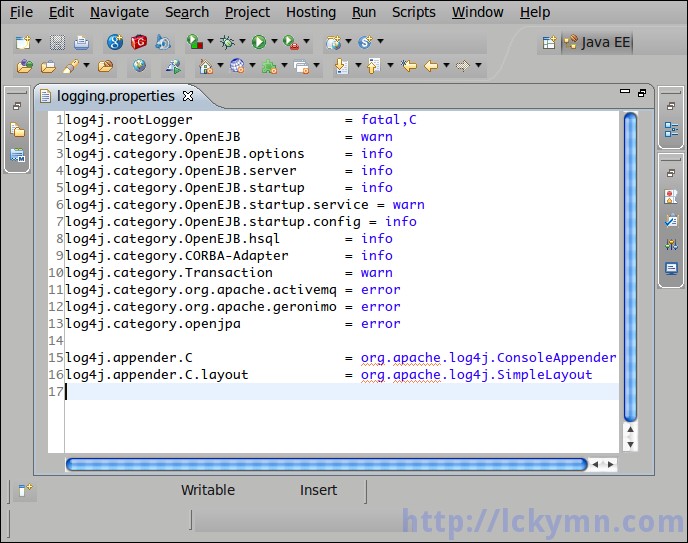
7. Create Web Application Project
Now, you can develop a web application using EJB3 and Hibernate as the implementation of the JPA.
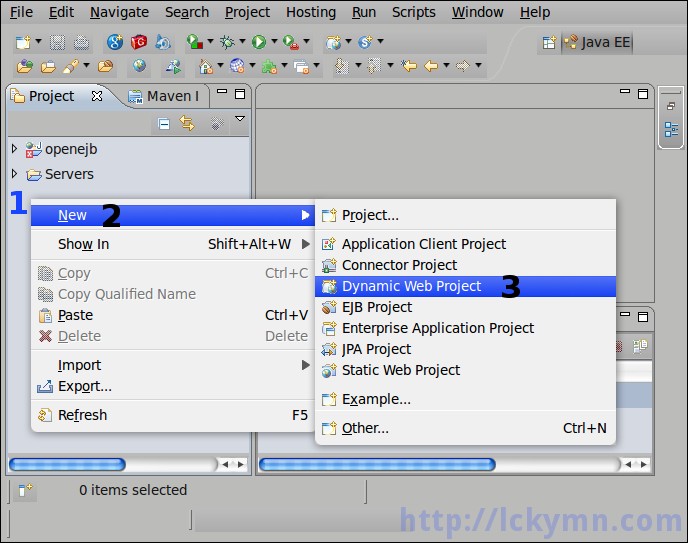
Right click on the project explorer -> Select 'New' -> Select 'Dynamic Web Project'
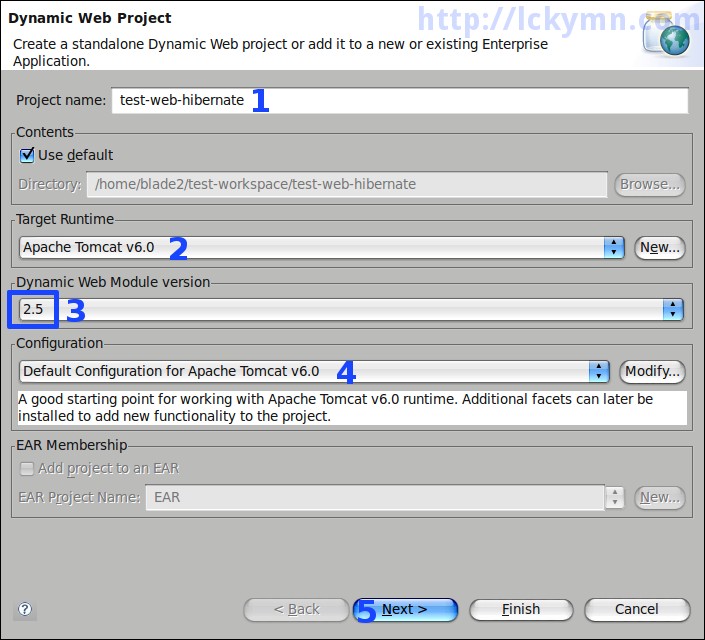
Put the name you like -> Select the 'Apache Tomcat v6.0' as the target runtime -> Select '2.5' as the version of 'Dynamic Web Module' -> Select the default Tomcat configuration or your own one -> Click the 'Next' button.
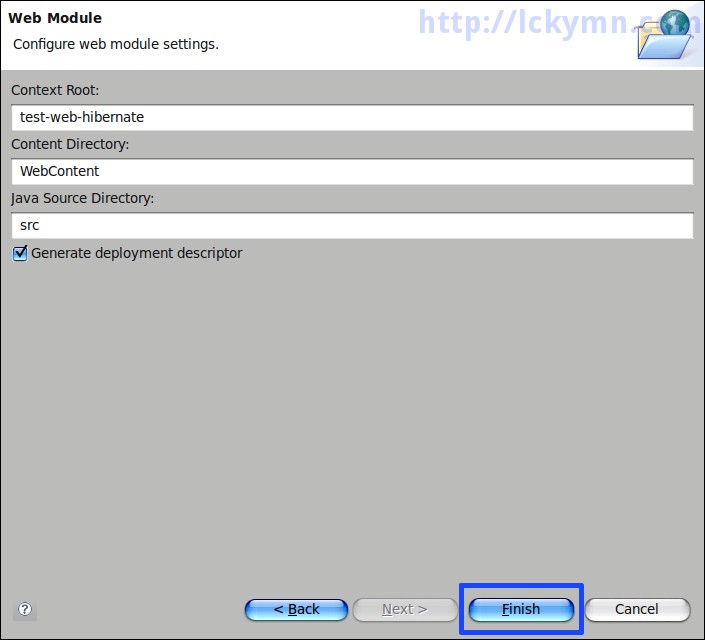
Change the project context root and directory names if you like -> Click the 'Finish' button.
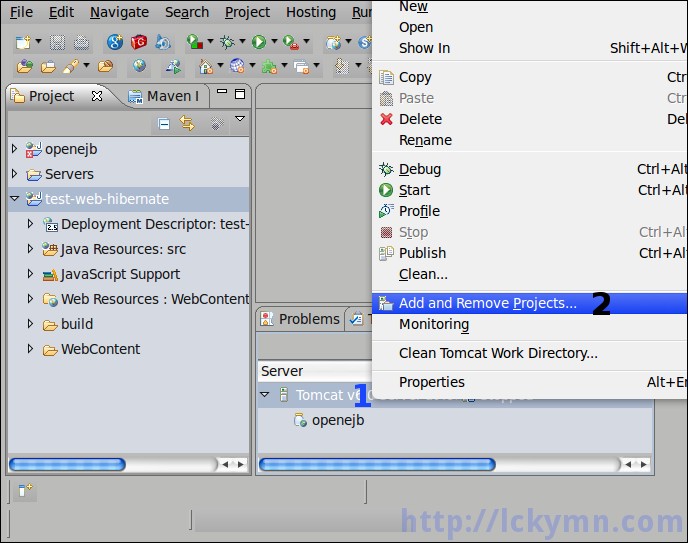
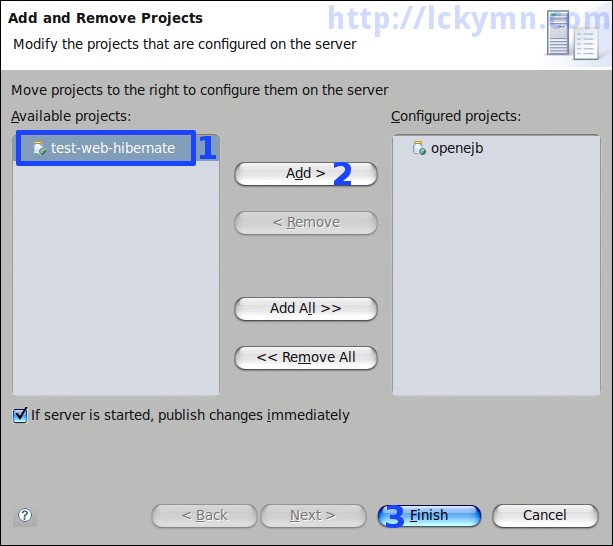
Right click on the Server to add the project -> Select the 'Add and Remove Projects...'.
Select the project you created -> Click the 'Add' button -> Click the 'Finish' button.
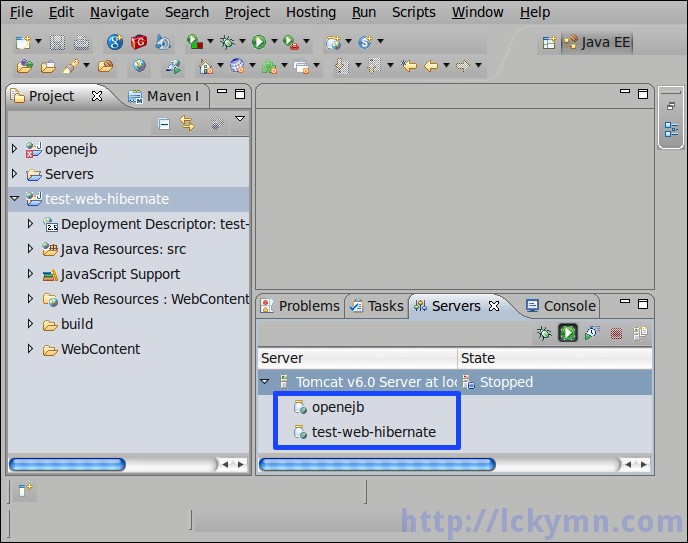
Both openejb and your project are added.
8. Make JPA Project
To use the JPA support feature of Eclipse, you need to change the project facet configuration.
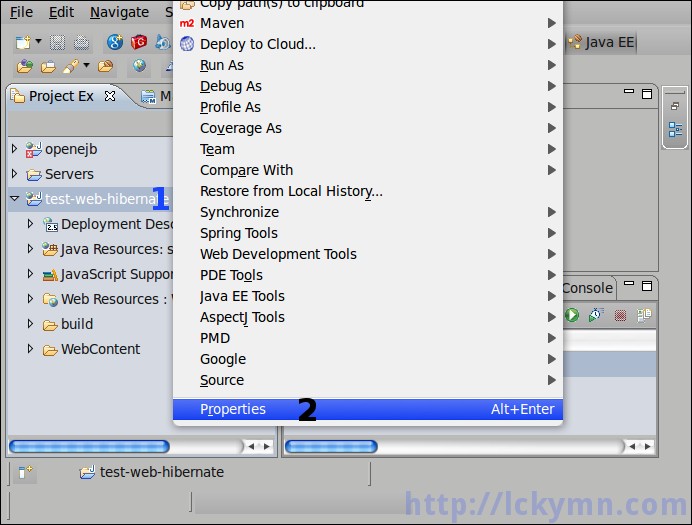
Right click on your project -> Select the 'Properties'.
Select the 'Project Facets' -> Check 'Java Persistence 1.0' -> Click the 'Further configuration available...' link.
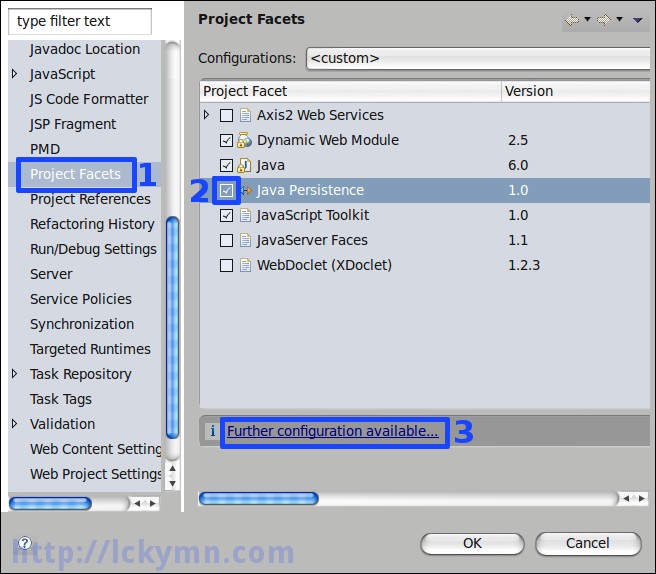
Select 'Generic' -> Select 'None' or your own connection or add a new connection if you wish -> Select 'Use implementation provided by server runtime' -> Select 'Discover annotated classes automatically' -> Uncheck 'Create orm.xml' option -> Click the 'OK' button.
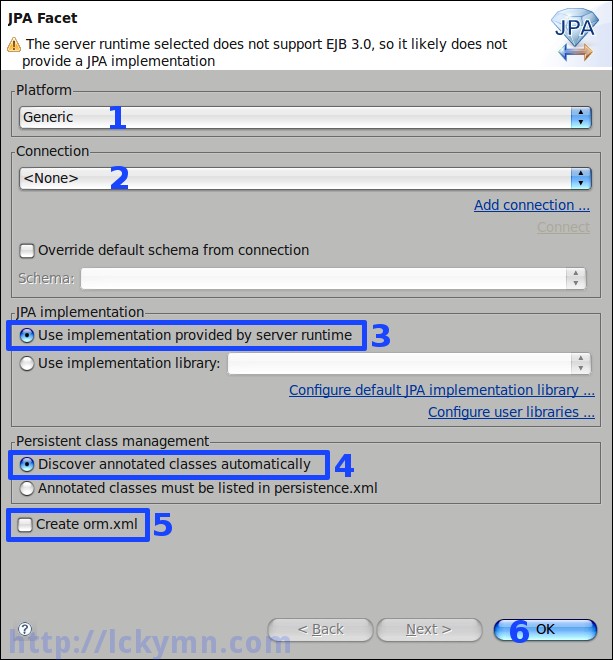
(I do usually not set up the connection yet if you want to generate entity classes from the existing tables, you'd better set it up).
9. Add Java EE 5 API library file
You also need to add the Java EE 5 API library file so you can use all the necessary annotations required for EJB3 and JPA.
Select 'Java Build Path on the left-hand side menu -> Select the 'Libraries' tab -> Click the 'Add JARs...' button.
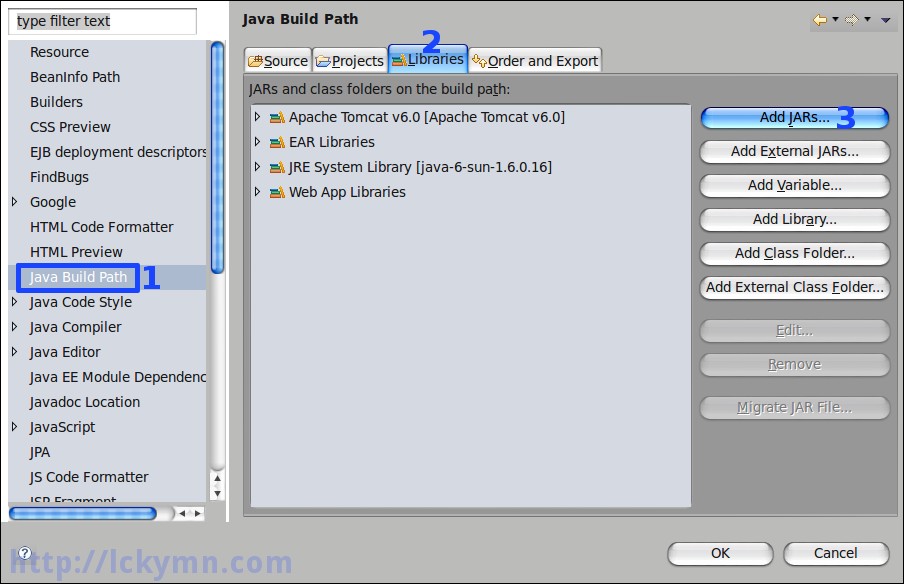
Select '
javaee-api-5.0-2.jar' in theopenejb/WebContent/libdirectory -> Click the 'OK' button.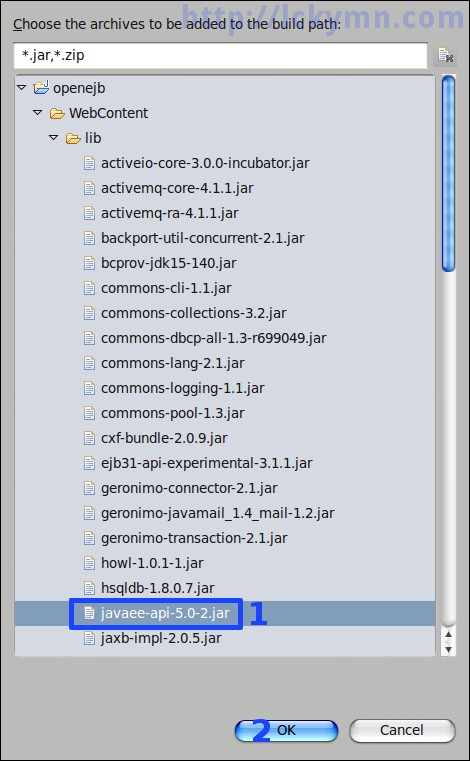
Click the 'OK' button.
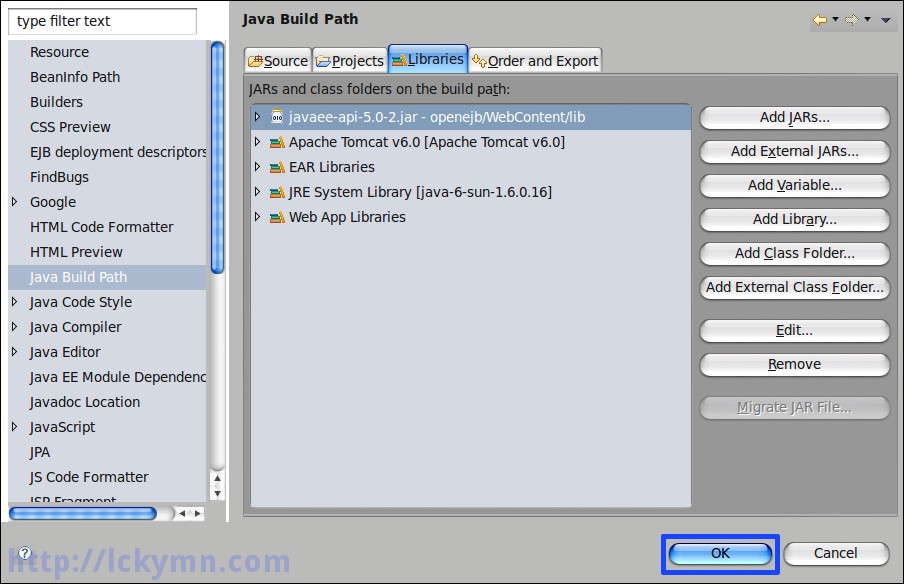
JPA configuration file (persistence.xml) is added.
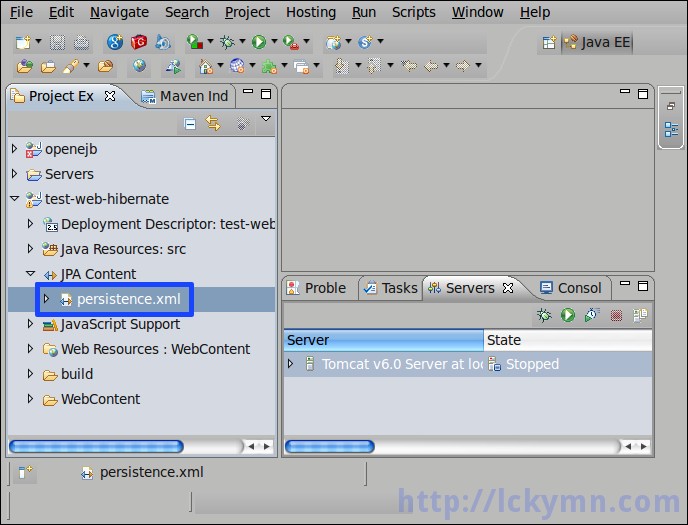
10. Configure persistence.xml file
It's the last step before starting to programme the actual application.
Open the persistence.xml file -> Type
org.hibernate.ejb.HibernatePersistenceto the 'Persistence Provider'.org.hibernate.ejb.HibernatePersistence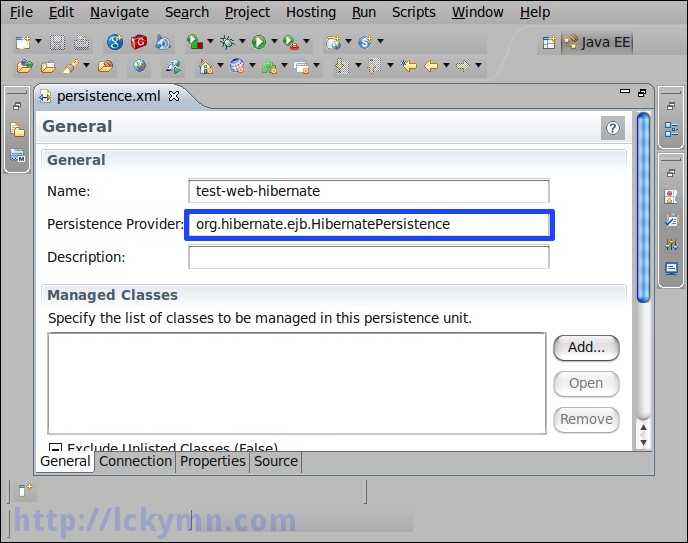
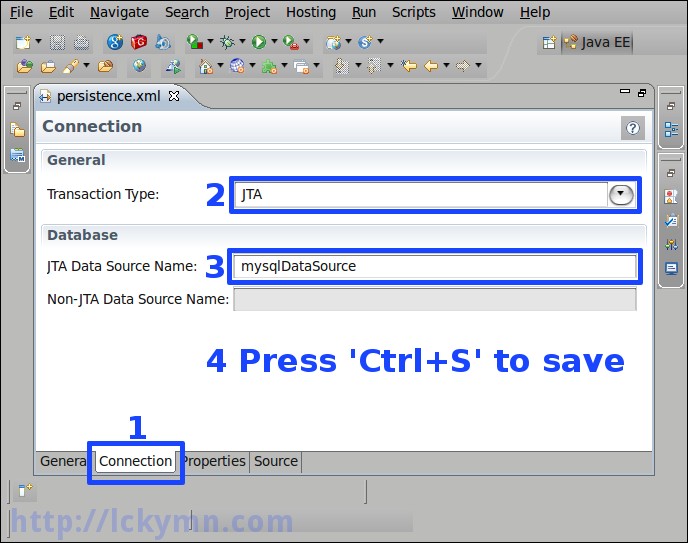
Click the 'Connection' tab -> Select the 'JTA' as the 'Transaction Type' -> Type 'mysqlDataSource' or your datasource name added in the previous steps. -> Press 'Ctrl + S' keys to save the file.
If you select the 'Source' tab, you should see the XML like this.
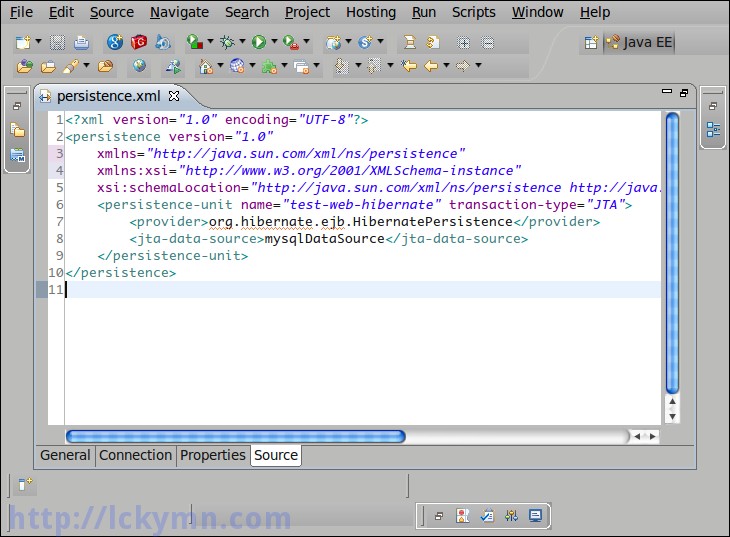
<?xml version="1.0" encoding="UTF-8"?>
<persistence version="1.0"
  xmlns="http://java.sun.com/xml/ns/persistence"
  xmlns:xsi="http://www.w3.org/2001/XMLSchema-instance"
  xsi:schemaLocation="http://java.sun.com/xml/ns/persistence http://java.sun.com/xml/ns/persistence/persistence_1_0.xsd">
  <persistence-unit name="test-web-hibernate" transaction-type="JTA">
    <provider>org.hibernate.ejb.HibernatePersistence</provider>
    <jta-data-source>mysqlDataSource</jta-data-source>
  </persistence-unit>
</persistence>
If you want Hibernate to automatically create the database tables based on your entity classes every time the server is restarted (in other words, the application is re-deployed), You can add Hibernate specific properties.
<?xml version="1.0" encoding="UTF-8"?>
<persistence version="1.0"
  xmlns="http://java.sun.com/xml/ns/persistence"
  xmlns:xsi="http://www.w3.org/2001/XMLSchema-instance"
  xsi:schemaLocation="http://java.sun.com/xml/ns/persistence http://java.sun.com/xml/ns/persistence/persistence_1_0.xsd">
  <persistence-unit name="test-web-hibernate" transaction-type="JTA">
    <provider>org.hibernate.ejb.HibernatePersistence</provider>
    <jta-data-source>mysqlDataSource</jta-data-source>
    <properties>
      <property name="hibernate.hbm2ddl.auto" value="create" />
    </properties>
  </persistence-unit>
</persistence>
11. Test
Finally, we have the development environment ready. To test, if I can use EJB3 and JPA with Hibernate on Tomcat, I made a very simple application. The way I design it is not my usual way yet I used Generic DAO pattern which I usually use.
11.1. Entity classes
Here is my only entity class in this test.
package com.lckymn.kevin.test.openejb.domain;

import java.io.Serializable;

import javax.persistence.Column;
import javax.persistence.Entity;
import javax.persistence.GeneratedValue;
import javax.persistence.GenerationType;
import javax.persistence.Id;
import javax.persistence.Table;

@Entity
@Table(name = "users")
public class User implements Serializable {

  private static final long serialVersionUID = 1L;

  @Id
  @GeneratedValue(strategy = GenerationType.AUTO)
  @Column(name = "user_id")
  private Long id;

  @Column(name = "username", nullable = false, length = 30)
  private String username;

  @Column(name = "surname", nullable = false, length = 50)
  private String surname;

  @Column(name = "given_name", nullable = false, length = 50)
  private String givenName;

  @Column(name = "email", nullable = true, length = 255)
  private String email;

  public Long getId() {
    return id;
  }

  public String getUsername() {
    return username;
  }

  public void setUsername(String username) {
    this.username = username;
  }

  public String getSurname() {
    return surname;
  }

  public void setSurname(String surname) {
    this.surname = surname;
  }

  public String getGivenName() {
    return givenName;
  }

  public void setGivenName(String givenName) {
    this.givenName = givenName;
  }

  public String getEmail() {
    return email;
  }

  public void setEmail(String email) {
    this.email = email;
  }

  @Override
  public boolean equals(Object obj) {
    if (this == obj) {
      return true;
    }

    if (!(obj instanceof User)) {
      return false;
    }
    User that = (User) obj;
    return (username == that.getUsername() || (null != username && username.equals(that.getUsername())));
  }

  @Override
  public int hashCode() {
    return (null == username ? 0 : username.hashCode());
  }
}
11.2. Generic DAOs
package com.lckymn.kevin.test.openejb.dao;

public interface GenericDao<E, K> {
  E find(K id);

  void persist(E e);

  void remove(E e);
}
package com.lckymn.kevin.test.openejb.dao;

import java.lang.reflect.ParameterizedType;

import javax.persistence.EntityManager;
import javax.persistence.PersistenceContext;

public abstract class AbstractGenericDao<E, K> implements GenericDao<E, K> {
  private Class<E> classType;

  @PersistenceContext(unitName = "test-web-hibernate")
  private EntityManager entityManager;

  @SuppressWarnings("unchecked")
  public AbstractGenericDao() {
    ParameterizedType parameterizedType = (ParameterizedType) getClass().getGenericSuperclass();
    classType = (Class<E>) parameterizedType.getActualTypeArguments()[0];
  }

  protected final EntityManager getEntityManager() {
    if (null == entityManager) {
      throw new IllegalStateException("EntityManager is not injected.");
    }
    return entityManager;
  }

  @Override
  public E find(K id) {
    return getEntityManager().find(classType, id);
  }

  @Override
  public void persist(E e) {
    getEntityManager().persist(e);
  }

  @Override
  public void remove(E e) {
    getEntityManager().remove(e);
  }
}
package com.lckymn.kevin.test.openejb.dao;

import java.util.List;

import javax.ejb.Local;

import com.lckymn.kevin.test.openejb.domain.User;

@Local
public interface UserDao extends GenericDao<User, Long> {
  List<User> getUsersByGivenName(String givenName);
}
package com.lckymn.kevin.test.openejb.dao;

import java.util.List;

import javax.ejb.Stateless;

import com.lckymn.kevin.test.openejb.domain.User;

@Stateless
public class UserDaoImpl
  extends AbstractGenericDao<User, Long>
  implements UserDao {

  @SuppressWarnings("unchecked")
  @Override
  public List<User> getUsersByGivenName(String givenName) {
    return getEntityManager().createQuery("from User where givenName = ?")
        .setParameter(1, givenName)
        .getResultList();
  }
}
11.3. Services
package com.lckymn.kevin.test.openejb.service;

import java.util.List;

import javax.ejb.Local;

import com.lckymn.kevin.test.openejb.domain.User;

@Local
public interface UserService {

  User getUser(long id);

  void AddUser(User user);

  List<User> getUserByGivenName(String givenName);
}
package com.lckymn.kevin.test.openejb.service;

import java.util.List;

import javax.ejb.EJB;
import javax.ejb.Stateless;

import com.lckymn.kevin.test.openejb.dao.UserDao;
import com.lckymn.kevin.test.openejb.domain.User;

@Stateless
public class UserServiceBean implements UserService {
  @EJB
  private UserDao userDao;

  @Override public User getUser(long id) {
    return userDao.find(id);
  }

  @Override public void AddUser(User user) {
    userDao.persist(user);
  }

  @Override
  public List<User> getUserByGivenName(String givenName) {
    return userDao.getUsersByGivenName(givenName);
  }

}
11. 4. Servlets
package com.lckymn.kevin.test.openejb.web;

import java.io.IOException;

import javax.ejb.EJB;
import javax.servlet.ServletException;
import javax.servlet.http.HttpServlet;
import javax.servlet.http.HttpServletRequest;
import javax.servlet.http.HttpServletResponse;
import javax.servlet.http.HttpSession;

import com.lckymn.kevin.test.openejb.domain.User;
import com.lckymn.kevin.test.openejb.service.UserService;

public class TestServlet extends HttpServlet {
  private static final long serialVersionUID = 1L;

  @EJB
  private UserService userService;

  protected void doGet(HttpServletRequest request, HttpServletResponse response)
    throws ServletException, IOException {
    doPost(request, response);
  }

  protected void doPost(HttpServletRequest request, HttpServletResponse response)
    throws ServletException, IOException {
    User user = new User();
    user.setUsername("kevinlee");
    user.setSurname("Lee");
    user.setGivenName("Kevin");
    user.setEmail("test@test.test");

    userService.AddUser(user);

    HttpSession session = request.getSession();
    session.setAttribute("user", user);

    getServletContext().getRequestDispatcher("/index.jsp") .forward(request, response);
  }

}
11.5. Deployment Descriptor (web.xml)
<?xml version="1.0" encoding="UTF-8"?>
<web-app xmlns:xsi="http://www.w3.org/2001/XMLSchema-instance"
  xmlns="http://java.sun.com/xml/ns/javaee" xmlns:web="http://java.sun.com/xml/ns/javaee/web-app_2_5.xsd"
  xsi:schemaLocation="http://java.sun.com/xml/ns/javaee http://java.sun.com/xml/ns/javaee/web-app_2_5.xsd"
  id="WebApp_ID" version="2.5">
  <display-name>test-web-hibernate</display-name>
  <servlet>
    <description></description>
    <display-name>TestServlet</display-name>
    <servlet-name>TestServlet</servlet-name>
    <servlet-class>com.lckymn.kevin.test.openejb.web.TestServlet</servlet-class>
  </servlet>
  <servlet-mapping>
    <servlet-name>TestServlet</servlet-name>
    <url-pattern>/Test</url-pattern>
  </servlet-mapping>
  <welcome-file-list>
    <welcome-file>index.jsp</welcome-file>
  </welcome-file-list>
</web-app>
11. 6. index.jsp
<?xml version="1.0" encoding="UTF-8" ?>
<%@ page language="java" contentType="text/html; charset=UTF-8"
    pageEncoding="UTF-8"%>
<!DOCTYPE html PUBLIC "-//W3C//DTD XHTML 1.0 Transitional//EN" "http://www.w3.org/TR/xhtml1/DTD/xhtml1-transitional.dtd">
<html xmlns="http://www.w3.org/1999/xhtml">
<head>
<meta http-equiv="Content-Type" content="text/html; charset=UTF-8" />
<title>Insert title here</title>
</head>
<body>
<div>
  <table>
    <tr>
      <td>User ID: </td><td>${user.id }</td>
    </tr>
    <tr>
      <td>Username: </td><td>${user.username }</td>
    </tr>
    <tr>
      <td>Surname: </td><td>${user.surname }</td>
    </tr>
    <tr>
      <td>Given name: </td><td>${user.givenName }</td>
    </tr>
    <tr>
      <td>Email: </td><td>${user.email }</td>
    </tr>
  </table>
</div>
</body>
</html>
12. Run the test application
Access the application URI
http://localhost:8080/test-web-hibernate/Test
It gives me this result.
User ID:  1
Username:   kevinlee
Surname:  Lee
Given name:   Kevin
Email:  test@test.test
*** Important ***
Note: Whenever you make changes in your application, Tomcat restarts the application context so that you don't need to restart the server to apply the changes you made. However, as mentioned several times, you are now using the EJB container so restarting application context is not enough to get your changes applied. Therefore, the EJB container has to be restarted which means you need to restart the Tomcat server to get the changes applied.