The end of the last month Spring Source released Spring ROO in alpha stage. My friend, Dr. Stefan Schmidt, who in fact used to teach me J2EE technology at UTS when I was a UTS student, has been working for Spring Source and is now involved in ROO development. Although ROO sounds really like Australian, it signifies Real Object-Oriented (ROO). After the release of the alpha version, Dr. Schmidt posted an introductory tutorial of ROO on his blog. He explained well so I could easily try this new mind-blowing technology. :)
Let's start a journey!
- Check your maven and JVM versions.
$ mvn --version
Maven version: 2.0.9
Java version: 1.6.0_13
OS name: "linux" version: "2.6.28-11-generic" arch: "amd64" Family: "unix"
I'm using Ubuntu Linux 9.04 Jaunty Jackalope desktop edition 64bit and installed Sun JDK & Maven2 from its repository.
Extract
spring-roo-1.0.0.A2.zipfile to/somepath/roo-1.0.0.A2Add the environment variable
ROO_HOMEwith the path of Roo home in the.bashrcfile.Add
$ROO_HOME/bintoPATHin the.bashrcfile.e.g.)
export ROO_HOME=/opt/lib/spring/roo-1.0.0.A2
PATH=${PATH}:$ROO_HOME/bin

export PATH
For Eclipse,
Extract
sts-roo-integration-1.0.0.A2.zipfile to theeclipse/dropinsfolder to use Spring ROO integration. This copying to the dropins directory only works for Eclipse Ganymede.Install ROO packages in the maven repository.
mvn install:install-file -DgroupId=org.springframework.roo \
  -DartifactId=roo-annotations -Dversion=1.0.0.A2 -Dpackaging=jar \
  -Dfile=$ROO_HOME/dist/roo-annotations-1.0.0.A2.jar
Result
$ mvn install:install-file -DgroupId=org.springframework.roo \
    -DartifactId=roo-annotations -Dversion=1.0.0.A2 -Dpackaging=jar \
    -Dfile=$ROO_HOME/dist/roo-annotations-1.0.0.A2.jar
[INFO] Scanning for projects...
[INFO] Searching repository for plugin with prefix: 'install'.
[INFO] ------------------------------------------------------------------------
[INFO] Building Maven Default Project
[INFO] task-segment: [install:install-file] (aggregator-style)
[INFO] ------------------------------------------------------------------------
[INFO] [install:install-file]
[INFO] Installing /opt/lib/spring/roo-1.0.0.A2/dist/roo-annotations-1.0.0.A2.jar to /home/blade2/.m2/repository/org/springframework/roo/roo-annotations/1.0.0.A2/roo-annotations-1.0.0.A2.jar
[INFO] ------------------------------------------------------------------------
[INFO] BUILD SUCCESSFUL [INFO] ------------------------------------------------------------------------
[INFO] Total time: 2 seconds
[INFO] Finished at: Tue May 05 22:09:23 EST 2009 [INFO] Final Memory: 7M/165M
[INFO] ------------------------------------------------------------------------
Now starts ROO console!
 $ mkdir roo_test
 $ cd roo_test/
 $ roo.sh
ROO Console
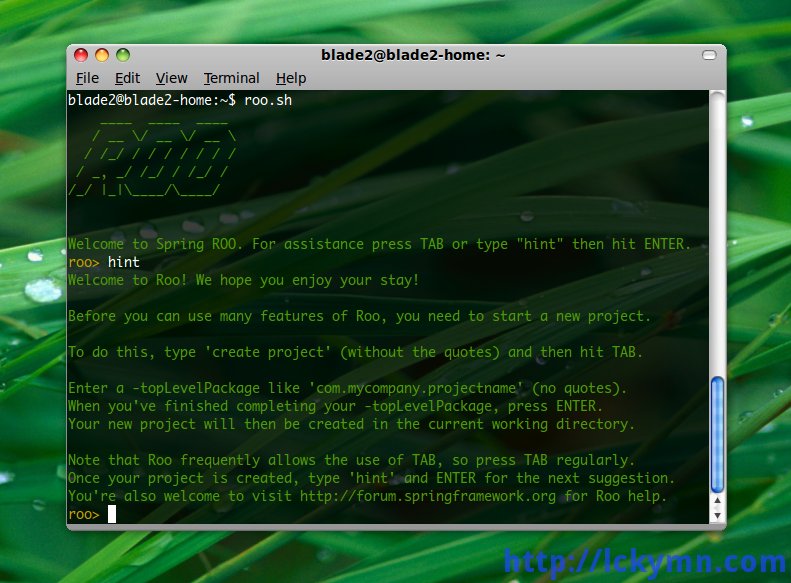
- Create a project directory for a ROO project.
roo> script vote.roo
(... wait until ROO console does it's job...)
roo> exit
Instead of following the script that Dr. Schmidt provided, I just used vote.roo which can be found in the samples directory. Well no special reasons, it just looks simpler. That's it. 🙂 If you are seeking more interesting one, you'd better try the one on the blog of Dr. Schmidt and then try your own one. ^O^
- In order to import the ROO project, just created, to Eclipse (STS), run maven2's eclipse plug-in.
$ mvn eclipse:eclipse [INFO] Scanning for projects...
[INFO] Searching repository for plugin with prefix: 'eclipse'.
[INFO] ------------------------------------------------------------------------
[INFO] Building vote
[INFO] task-segment: [eclipse:eclipse]
[INFO] ------------------------------------------------------------------------
[INFO] Preparing eclipse:eclipse
Downloading:
... lots of dependencies including spring framework 3.0.0.M2 ...

[INFO] ------------------------------------------------------------------------
[INFO] BUILD SUCCESSFUL
[INFO] ------------------------------------------------------------------------
[INFO] Total time: 7 minutes 26 seconds
[INFO] Finished at: Tue May 05 22:32:18 EST 2009
[INFO] Final Memory: 31M/353M
[INFO] ------------------------------------------------------------------------
Well, although it says
Sources for some artifacts are not available.
Javadoc for some artifacts is not available.
it is not that important unless I really want to see the missing source code and Javadoc of the artifacts listed with the message.
If you want to get it, add -DdownloadSources=true -DdownloadJavadocs=true options and run maven again.
$ mvn eclipse:eclipse -DdownloadSources=true -DdownloadJavadocs=true
I'm not sure if the source is available though. The source code is not available at the moment though. I was wrong. The source code is available. Check this out. http://forum.springsource.org/showthread.php?t=71985
- Now run Eclipse. Since ROO is a part of Spring Framework, I'm using SpringSource Tool Suite (STS) for this practice.
SpringSource Tool Suite
Well, before I go further, here are what I am using.
SpringSource Tool Suite (STS) 2.0.0
- Apart from all the Spring related plug-ins that STS comes with, it also comes with several good plug-ins such as AspectJ Development Tools (AJDT), PMD for Eclipse (Java source code analyser) and EclEmma (Code Coverage Tool) which are what I usually install when I use pure Eclipse JEE.
Eclipse Plug-ins
- Subclipse
- Maven Integration for Eclipse (M2Eclipse)
- Aptana
- JDepend (Java source code analyser)
- Copy Fully Qualified Class Name Plugin
- Resource Bundle Editor
- and of course Spring ROO Integration for Eclipse (I heard a new STS will include it).
However, what are really required for this ROO practice are Eclipse JEE, Spring IDE, AJDT, M2Eclipse and Spring ROO Integration. Or you can simply use STS and install M2Eclipse and Spring ROO Integration. If you use Eclipse JEE Ganymede and install Spring IDE, it will automatically install AJDT as a dependency of Spring IDE since Ganymede has a smart software & add-ons update manager. 🙂
(Good News: A free version of STS is released. Check this out SpringSource Tool Suite now free).
Import ROO project
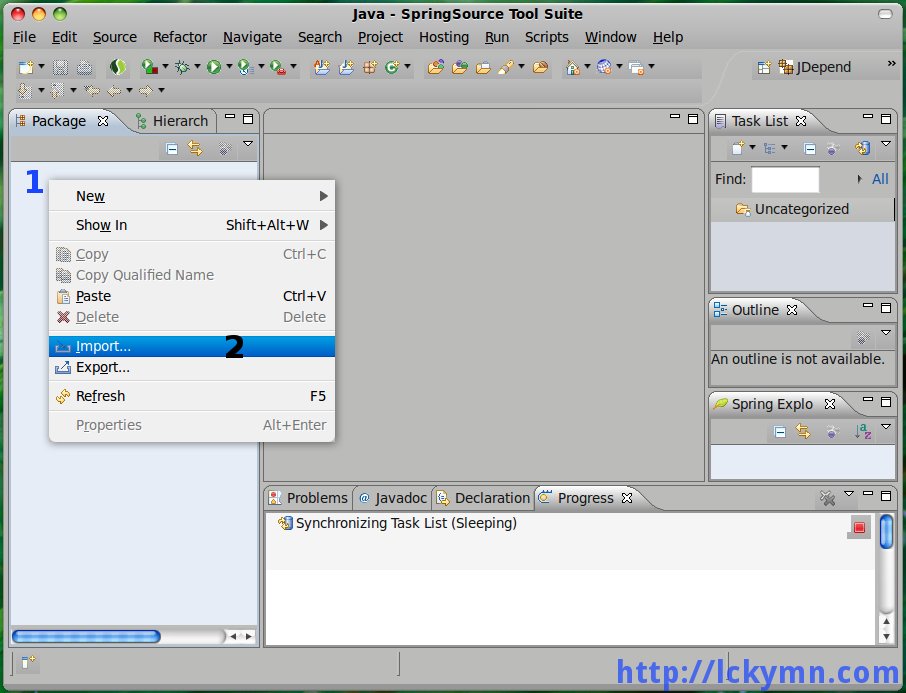
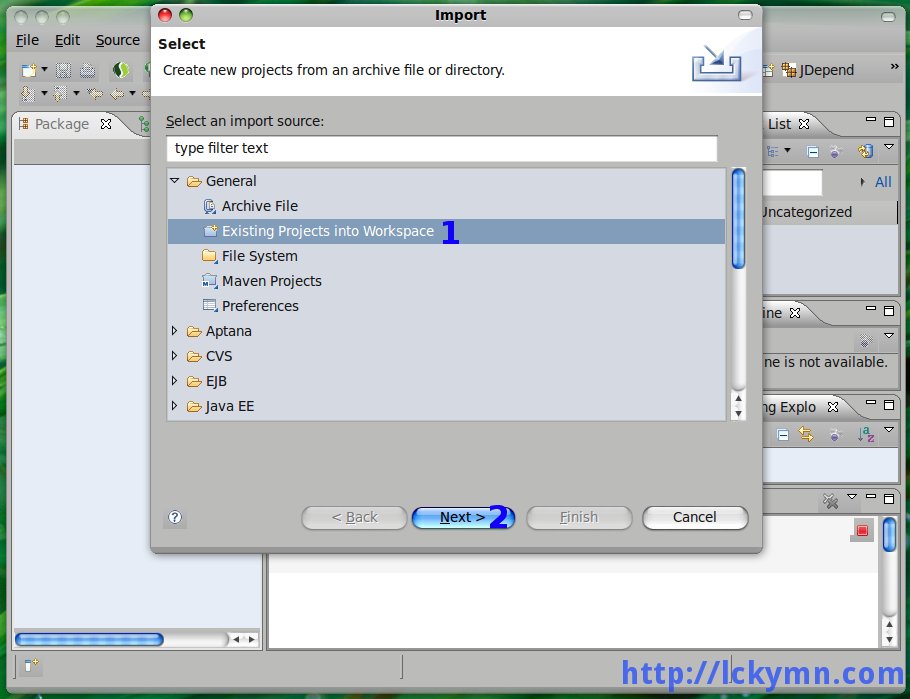
Expand the General entry -> Select Existing Projects into Workspace -> Click the Next button.
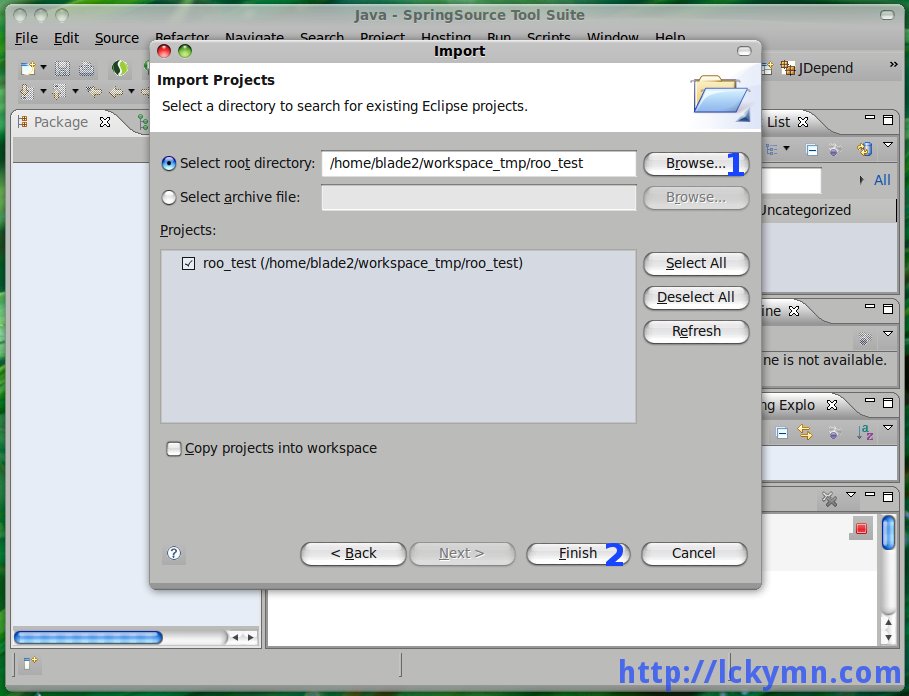
Browse the roo project directory created by roo. In my case it's roo_test -> Click the Finish button. (NOTE: Because I created the roo project directory inside the workspace of Eclipse (STS), I don't need to check Copy projects into workspace option.)
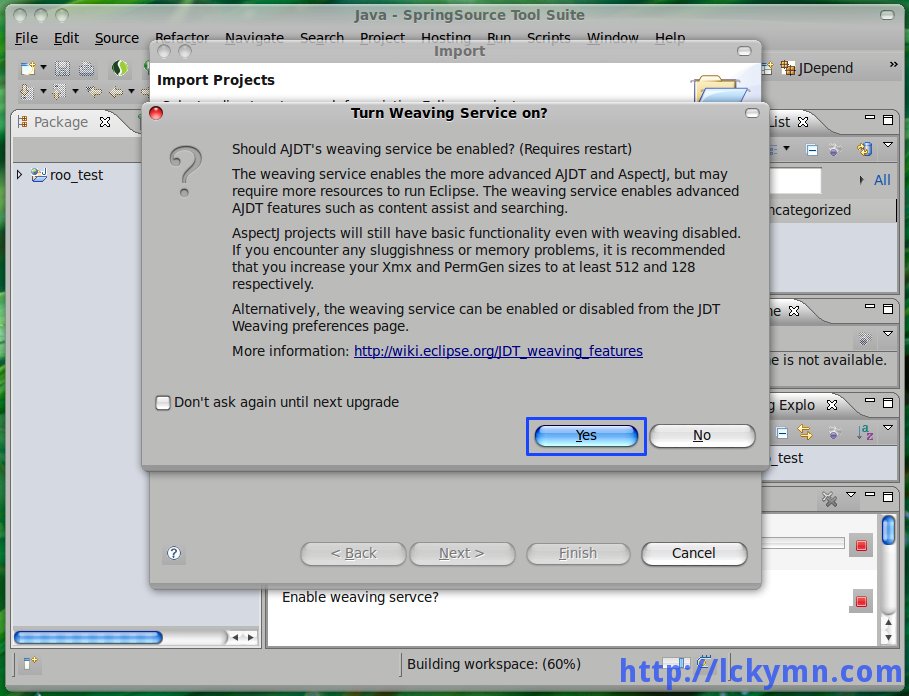
If Eclipse asks to turn on weaving service function of AJDT, Click the Yes button.
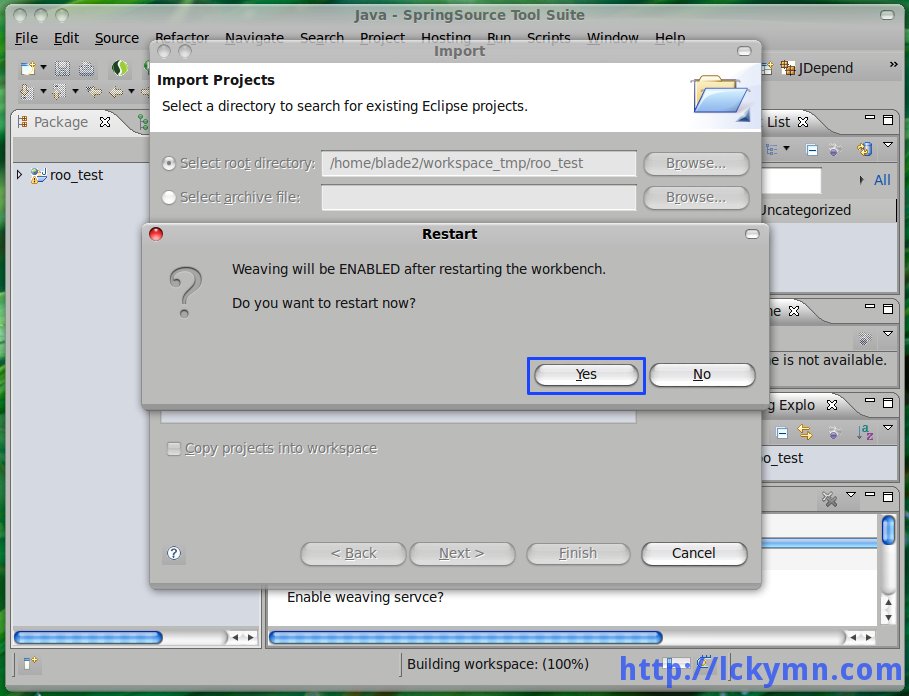
Restart Eclipse.
Eclipse is restarted and there are errors in the project as the require dependencies are not in the project directory.
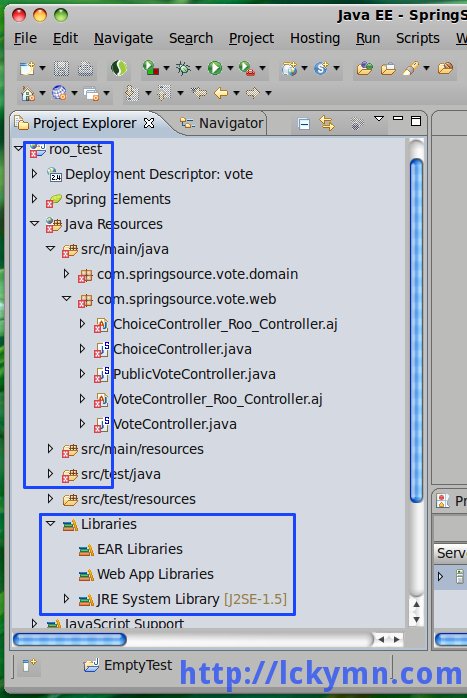
So now, let M2Eclipse resolves this dependency problem. That's why I'm using this plug-in. I want to focus on real problems in software development rather than focusing on providing dependency libraries for development.
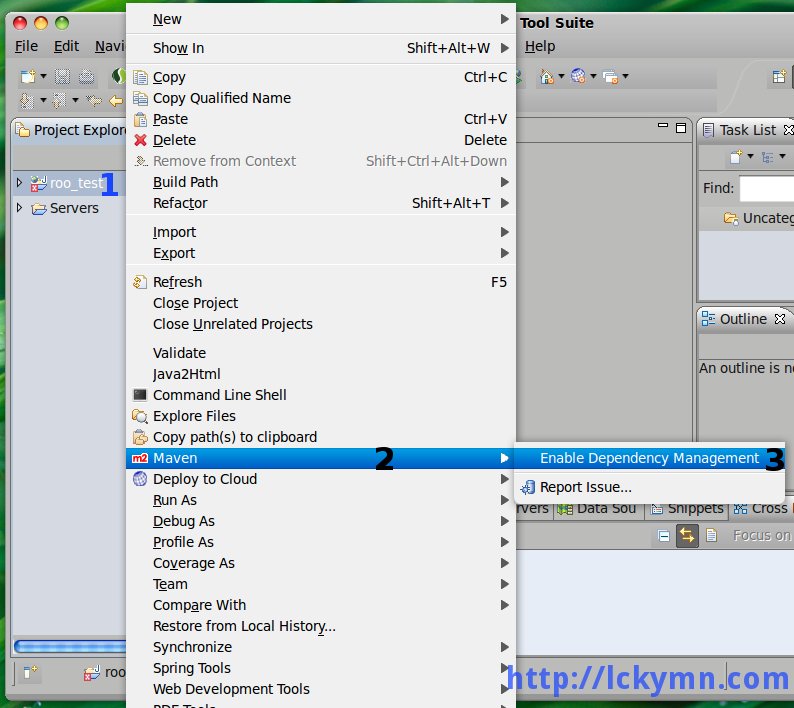
Right click on the project -> Select the Maven option on the menu -> Select the Enable Dependency Management. Wait until it does its job.
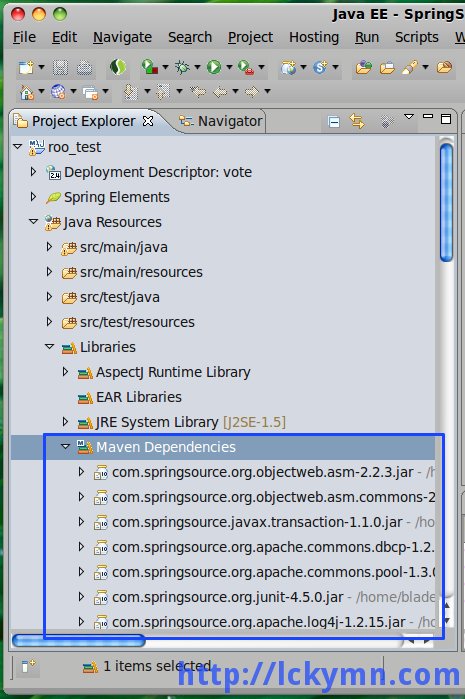
As shown here, Maven resolved it so all the required dependencies are there.
